Neovim Editions
Introduction to a Neovim flake for hosting multiple Neovim editions with inheritance. Instead of having one large configuration for multiple tasks, we can create multiple editions focused on specific tasks. With inheritance, we can reuse configurations from one edition in another. In this article, I will provide a step-by-step guide with beginner-friendly explanations on how to create your own flake.
- Personal story
- Before we start
- What will we create - Neovim edition
- What will we create - Neovim editions hierarchy
- What will we create - Neovim editions flake
- Step 1: Prepare the flake
- Step 2: Add Neovim nightly overlay
- Step 3: Add Neovim nix utils
- Interlude - about running Neovim editions
- Step 4: Create Neovim light edition
- Step 5: Create Neovim base edition
- Step 6: Create Neovim web edition
- Conclusion
§ Personal story
Here on my blog, I wrote a post about creating your own Neovim flake. It wasn't anything extraordinary, but it had been working for me for several years. Adding plugins and tweaking configurations was easy and problem-free (most of the time).
I use Neovim as daily driver for web development. Apart from that I use it for side projects often programmed with different languages. For that are necessary different language servers and different plugins. I didn't like that my configuration is becoming a mix of everything.
Therefore, recently I have reworked my Neovim flake. Instead of providing one editor for everything the flake provides now multiple editions of Neovim configured for a specific task.
Also, my skills with nix have slightly improved. Especially, getting familiar with Haumea granted me access to neatly organized modules.
After using these editions for a few weeks, I'm sure it was the right choice.
§ Before we start
The previous articles are called How to create your own Neovim flake.
This article stands alone. You do not need to read the previous one. Although I may not delve deeply into analyzing every line like before, you may still find it useful to read through it.
All the code you can find in github:PrimaMateria/blog-example-neovim-editions.
I assume that you are familiar with the basics of Nix and know what a Nix flake is.
§ What will we create - Neovim edition
graph LR;
    neovim --> dependencies
    neovim --> dependenciesEnd
    neovim --> plugins
    neovim --> config
    neovim --> treesitterPlugins
    neovim --> envVars
    config --> lua
    config --> vim
    config --> luanix
    config --> vimnix
This is how a single edition will look like. In the dependencies we can specify packages that will be available during the runtime to the Neovim. For example in the web edition there will be typescript language server, eslint_d daemon providing engine for linting, or prettier tool allowing us to format the code.
The plugins will be a list of Vim or Neovim plugins either from the Nixpkgs, or from plugins that we packaged ourselves if they are not yet included in Nixpkgs.
Config will hold 4 types: lua and vim, are raw config files in their respective formats. luanix and vimnix are nix files that return the lua or vim script as a string.
In the past, I needed to configure a plugin with a path to a binary of a dependency package. The path to the package in the nix store is not static, as the hash is generated based on the content of the current version. Therefore, I couldn't hard-code it into the raw lua config, but had to pass it as a nix variable. This led to the creation of luanix and vimnix. Although I no longer use it, I will include it in the tutorial in case you find yourself in need of it.
I also noticed that some similar changes are recently being included into the nixpkgs Neovim wrapper function. I just took a brief look on it, and if I understand it right then there will be a mechanism that will parse lua scripts and expand some placeholders with computed full nix store path.
We should keep eye on it!
§ What will we create - Neovim editions hierarchy
graph LR;
    light --> base
    base --> web
This tutorial will create minimal and not very useful editions, but just enough to cover the key aspects of the different types of configurations.
My real-life editions currently look like this:
graph LR;
    light --> base
    base --> web
    base --> blog
    base --> puml
    base --> rust
    base --> python
Light Neovim is very basic configuration acting as a pure text editor, for example, when you need to use it remotely, and you don't want to waste time on a big Nix build.
The base edition inherits configuration from the light edition and also provides generic IDE capabilities such as enhanced navigation, basic refactoring tools, git support, and AI tools.
The final layer of task-oriented editions inherits configuration from the base IDE. There is a web edition for web development, a blog edition with support for writing blog posts, a Puml edition for writing and generating PlantUML diagrams, and simple Rust and Python editions for some side projects that I don't use very often.
§ What will we create - Neovim editions flake
graph LR;

    systems@{ shape: procs, label: "systems" }
    editions@{ shape: procs, label: "neovim editions" }
    vimPlugins@{ shape: procs, label: "vim plugins" }
    otherPackages@{ shape: procs, label: "other packages" }

    flake --> outputs
    outputs --> packages
    packages --> systems
    systems --> editions
    systems --> vimPlugins
    systems --> otherPackages
This is how the flake's outputs will look. It offers packages that are compatible with different systems, allowing you to run it on systems such as Linux or WSL on x86_64, as well as on Mac on aarch64-darwin.
The packages will include the Neovim editions, Vim plugins that we did not find in the Nixpkgs and had to package ourselves. Additionally, we will have an adjusted LazyGit package in the other packages.
Afterward, you will be able to run any edition with commands like these:
nix run github:PrimaMateria/blog-neovim-editions#neovim.light
nix run github:PrimaMateria/blog-neovim-editions#neovim.base
nix run github:PrimaMateria/blog-neovim-editions#neovim.web
Go ahead, try it now.
§ Step 1: Prepare the flake
.
└── flake.nix
#flake.nix
{
  description = "neovim editions - PrimaMateria blog tutorial";

  outputs = {
    self,
    nixpkgs,
    utils,
    haumea,
    ...
  }:
    utils.lib.eachDefaultSystem (
      system: let
        pkgs = import nixpkgs {
          inherit system;
          config = {allowUnfree = true;};
        };
      in (haumea.lib.load {
        src = ./src;
        inputs = {
          inherit pkgs;
        };
        transformer = haumea.lib.transformers.liftDefault;
      })
    );

  inputs = {
    nixpkgs.url = "github:nixos/nixpkgs/master";
    utils.url = "github:numtide/flake-utils";
    haumea = {
      url = "github:nix-community/haumea";
      inputs.nixpkgs.follows = "nixpkgs";
    };
  };
}
The inputs are Nixpkgs, flake-utils, and Haumea. Nixpkgs is the primary package repository for the Nix ecosystem. Flake-utils is a library that simplifies the definition of flakes. Haumea is a filesystem-based module system for Nix.
And the outputs are build using flake-utils and Haumea. Haumea constructs nix
set from the filesystem with root in the ./src folder. The nix files under src
contain a function. This function is invoked with default Huamea parameters plus
with parameters specified in the inputs - so the system bound pkgs.
Additionally, we use Haumea transformer liftDefault. This tells Haumea that
./src/foo/default.nix will be resolved to { foo: "I am foo" } instead of { foo: { default: "I am foo" }}.
§ Step 2: Add Neovim nightly overlay
The Neovim nightly overlay offers a Nix package of the Neovim nightly build. By using this, you can access the latest updates and features. While this can be beneficial, there is also a risk of encountering issues. Alternatively, you can continue using Neovim from the Nixpkgs repository, either from the unstable channel (as shown in this example) or from the stable channel. If so, skip this step.
#flake.nix
{
  description = "neovim editions - PrimaMateria blog tutorial";

  outputs = {
    self,
    nixpkgs,
    utils,
    haumea,
    neovimNightlyOverlay,
    ...
  }:
    utils.lib.eachDefaultSystem (
      system: let
        pkgs = import nixpkgs {
          inherit system;
          config = {allowUnfree = true;};
          overlays = [neovimNightlyOverlay.overlays.default];
        };
      in (haumea.lib.load {
        src = ./src;
        inputs = {
          inherit pkgs;
          inherit (pkgs.lib) debug;
        };
        transformer = haumea.lib.transformers.liftDefault;
      })
    );

  inputs = {
    nixpkgs.url = "github:nixos/nixpkgs/master";
    utils.url = "github:numtide/flake-utils";
    haumea = {
      url = "github:nix-community/haumea";
      inputs.nixpkgs.follows = "nixpkgs";
    };
    neovimNightlyOverlay = {
      url = "github:nix-community/neovim-nightly-overlay";
      inputs.nixpkgs.follows = "nixpkgs";
    };
  };
}
We add the neovim-nightly-overlay flake to the inputs and include the default
overlay in the list of overlays when configuring nix packages. From now on, the
package pkgs.neovim will refer to the nightly build.
§ Step 3: Add Neovim nix utils
github:PrimaMateria/neovim-nix-utils is a flake that I have written to provide a library with functions that assembles Neovim editions.
.
└── src
    └── _lib.nix
#flake.nix
{
  description = "neovim editions - PrimaMateria blog tutorial";

  outputs = {
    self,
    nixpkgs,
    utils,
    haumea,
    neovimNightlyOverlay,
    neovim-nix-utils,
    ...
  }:
    utils.lib.eachDefaultSystem (
      system: let
        pkgs = import nixpkgs {
          inherit system;
          config = {allowUnfree = true;};
          overlays = [neovimNightlyOverlay.overlays.default];
        };
        neovimNixLib = neovim-nix-utils.lib.${system};
      in (haumea.lib.load {
        src = ./src;
        inputs = {
          inherit pkgs;
          inherit neovimNixLib;
        };
        transformer = haumea.lib.transformers.liftDefault;
      })
    );

  inputs = {
    nixpkgs.url = "github:nixos/nixpkgs/master";
    utils.url = "github:numtide/flake-utils";
    haumea = {
      url = "github:nix-community/haumea";
      inputs.nixpkgs.follows = "nixpkgs";
    };
    neovimNightlyOverlay = {
      url = "github:nix-community/neovim-nightly-overlay";
      inputs.nixpkgs.follows = "nixpkgs";
    };
    neovim-nix-utils = {
      url = "github:PrimaMateria/neovim-nix-utils";
      inputs.nixpkgs.follows = "nixpkgs";
    };
  };
}
Add flake to inputs, and list it in the outputs function parameter. In the let
clause, select the system-specific library and add it to the Haumea`s inputs so
that we can access it in the file modules.
#src/_lib.nix
{
  pkgs,
  root,
  neovimNixLib,
}: let
  initializedNeovimNixLib = neovimNixLib.init {
    neovimPackage = pkgs.neovim;
    editionsDir = ./packages/neovim;
    editionsSet = root.packages.neovim;
  };
in {
  assembleNeovim = {name}:
    initializedNeovimNixLib.assembleNeovim {inherit name;};
}
Create new local lib module. It will initialize the utils lib. We need to provide the Neovim package.
Here you can see that the Haumea file module starts with an underscore. This
means that the file module will not be included in the attribute set, but it
will still be accessible through Haumea's root and super parameters. You can
investigate more in Haumea Cheatsheet
§ Interlude - about running Neovim editions
Here start examples of Neovim configuration. I will keep it minimal just enough to be able to present different aspects. It's up to how will you decide to organize your editions. If you want to have a real life example you can take a look on my repo github:PrimaMateria/neovim-nix.
By the way, do not attempt to run Neovim editions from that repository because
it is using git-crypt to encode secrets. Without unlocking it with a secret
key, the file content will be encrypted gibberish and the nix build will fail.
What a boomer. Now we can't use the Neovim editions without first cloning the
repo and unlocking it locally. It would be nicer just to be able to run nix run github:PrimaMateria/neovim-nix#neovim.web.
I have a few well-configured environments that I use regularly. I never SSH to
some remote servers where I would need to edit configuration files. If I did,
then it would make sense to deal with the hindrance of git-crypt. By the way,
running Neovim from a local path like nix run /home/primamateria/dev/neovim-nix#neovim.web has one more advantage: edits are
applied right after saving, so I don't need to push them to the GitHub
repository or reload the home manager if I were to use the package there.
§ Step 4: Create Neovim light edition
In the light edition, I will demonstrate how to add plugins and configure them easily. We will add the nvim-tree plugin and enable line numbers.
.
└── src
    └── packages
        ├── neovim
        │   └── light
        │       ├── __config
        │       │   ├── lua
        │       │   │   └── nvim-tree.lua
        │       │   └── vim
        │       │       └── setters.vim
        │       ├── _manifest.nix
        │       ├── _plugins.nix
        │       └── default.nix
        └── vimPlugins
#src/packages/neovim/light/_manifest.nix
{}: {name = "light";}
Manifest is supposed to list metadata of the edition. In this case we have only the name.
#src/packages/neovim/light/default.nix
{root}: root.lib.assembleNeovim {name = "light";}
This is default file that becomes the edition package in the flake output. We call our library to assemble Neovim and pass the name.
The name is duplicated in both the manifest and the default. I attempted to
reference it using super.manifest.name, but this resulted in infinite
recursion errors, so I have accepted this little duplication.
#src/packages/neovim/light/_plugins.nix
{pkgs}: with pkgs.vimPlugins; [nvim-tree-lua]
Plugins module returns list of plugins.
--src/packages/neovim/light/__config/lua/nvim-tree.lua
require("nvim-tree").setup({})
"src/packages/neovim/light/__config/vim/setters.vim
set number
Lua and vim scripts are simply placed in the __config folder. The
neovim-nix-utils then iterates through the files, stores them in a nix store
derivation, and adds a source command for each to Neovim RC.
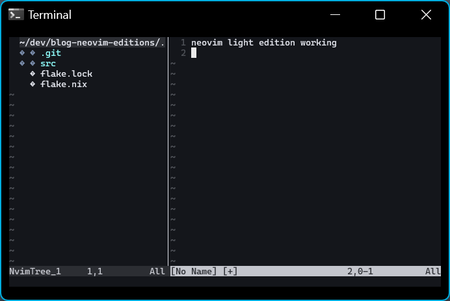
Test it by running in the root directory where the flake.nix is stored: nix run .#neovim.light.
For my real-life light edition, I set up basic navigation using nvim-tree and telescope, and also configured the editor's appearance with colorscheme, lualine, and noice notifications.
§ Step 5: Create Neovim base edition
In the basic edition, we will include the lazygit plugin. However, the lazygit program will be wrapped with our own configuration. Let's begin with this.
.
└── src
    └── packages
        ├── lazygit.nix
        ├── neovim
        │   ├── base
        │   │   ├── __config
        │   │   │   └── lua
        │   │   │       └── lazygit-nvim.lua
        │   │   ├── _dependencies.nix
        │   │   ├── _manifest.nix
        │   │   ├── _plugins.nix
        │   │   └── default.nix
        │   └── light
        └── vimPlugins
#src/packages/lazygit.nix
{pkgs}: let
  lazygitConfig = (pkgs.formats.yaml {}).generate "lazygit-config.yaml" {
    os = {
      edit = ''$NVIM_SELF --server "$NVIM" --remote-tab {{filename}}'';
      editAtLine = ''$NVIM_SELF --server "$NVIM" --remote-tab {{filename}}; [ -z "$NVIM" ] || $NVIM_SELF --server "$NVIM" --remote-send ":{{line}}<CR>"'';
      editAtLineAndWait = ''$NVIM_SELF +{{line}} {{filename}}'';
      openDirInEditor = ''$NVIM_SELF --server "$NVIM" --remote-tab {{dir}}'';
      suspend = false;
    };
  };
in
  pkgs.writeShellApplication {
    name = "lazygit";
    text = ''
      ${pkgs.lazygit}/bin/lazygit --use-config-file ${lazygitConfig} "$@"
    '';
  }
The package lazygit is a shell application that uses the original lazygit from the Nixpkgs, but also sets the config file to point to the nix store. The config can be written in nix and converted to YAML.
By default, lazygit will open a new Neovim instance inside a floating window
where the Neovim plugin runs it inside the terminal. This configuration makes
lazygit to open selected files in the current Neovim session instead. This is
achieved using the environment variable $NVIM_SELF, which points to the
executable of the edition and is automatically set up by the utilities when
calling assembleNeovim.
Opening files in the same session can be clunky - sometimes the floating window remains open, which can be quite annoying. However, it does work. I may be overlooking something in the configuration.
#src/packages/neovim/base/default.nix
{root}: root.lib.assembleNeovim {name = "base";}

#src/packages/neovim/base/_manifest.nix
{}: {
  name = "base";
  basedOn = "light";
}

#src/packages/neovim/base/_plugins.nix
{pkgs}:
with pkgs.vimPlugins; [
  lazygit-nvim
]

#src/packages/neovim/base/_dependencies.nix
{root}: with root.packages; [lazygit]
The process of creating the edition is quite simple. Additionally, in the
manifest, we set the attribute basedOn to establish inheritance from the light
edition. We also add a new module called dependencies and include the wrapped
lazygit that we have prepared. You can add any other dependencies from Nixpkgs
by using Haumea's pkgs input that we have made available to all Haumea modules
in our flake.
--src/packages/neovim/base/__config/lua/lazygit-nvim.lua
vim.api.nvim_set_keymap("n", "<A-g>", "<cmd>LazyGit<cr>", { noremap = true })
alt+g keymap to open the lazygit.
Now, we will add a plugin that is not in the Nix store. Just today, I saw on Reddit go_up.nvim. Let's give it a try.
.
└── src
    └── packages
        ├── neovim
        │   ├── base
        │   │   ├── __config
        │   │   │   └── lua
        │   │   │       └── go-up-nvim.lua
        │   │   ├── _plugins.nix
        │   └── light
        └── vimPlugins
            └── go-up-nvim.nix
#src/packages/vimPlugins/go-up-nvim.nix
{pkgs}:
pkgs.vimUtils.buildVimPlugin {
  name = "go-up-nvim";
  src = pkgs.fetchFromGitHub {
    owner = "nullromo";
    repo = "go-up.nvim";
    rev = "master";
    hash = "sha256-+F89qRssyF+73cmWPHfXwg6fijV9EOdtL+uore0BSps=";
  };
}
We are using buildVimPlugin utility from the nixpkgs.
#src/packages/neovim/base/_plugins.nix
{
  pkgs,
  root,
}:
with pkgs.vimPlugins;
with root.packages.vimPlugins; [
  lazygit-nvim
  go-up-nvim
]
--src/packages/neovim/base/__config/lua/go-up-nvim.lua
require("go-up").setup()
Use root to refer to the new vim plugin package in the plugin list and create
a simple Lua configuration that will load the plugin with default options.
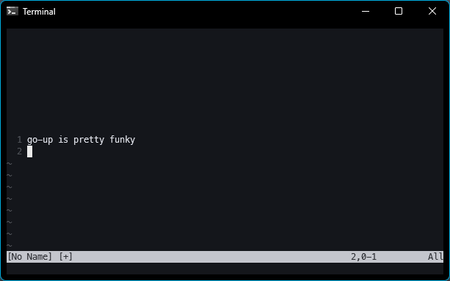
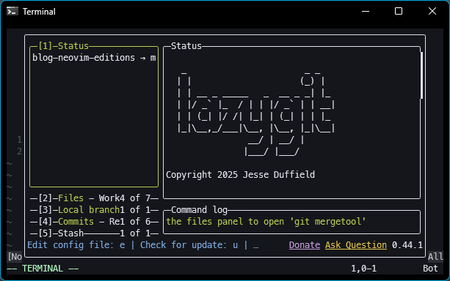
Run nix run .#neovim.base and try pressing zz on the first line to see it
jump to the center. This is the go-up plugin. Press alt+g to bring up
lazygit. If you have a file, try pressing e to see if it opens in the
underlying Neovim window. Notice that the buffer line numbers and nvim-tree are
inherited from the light edition.
My real-life base edition, has the most extensive configuration. Here, I have set up all aspects of a generic IDE, including refactoring, git support, a snippets' engine (although each project edition has its own snippets), AI support, language server keybindings, and linting & formatting.
§ Step 6: Create Neovim web edition
Web edition is here to showcase the last aspects of assembling. We will add quirky node package dependencies, treesitter plugins and provide environment variables.
.
└── src
    └── packages
        ├── neovim
        │   └── web
        │       ├── _dependenciesEnd.nix
        │       ├── _envVars.nix
        │       ├── _manifest.nix
        │       ├── _treesitterPlugins.nix
        │       └── default.nix
        └── vimPlugins
#src/packages/neovim/web/default.nix
{root}: root.lib.assembleNeovim {name = "web";}

#src/packages/neovim/web/_manifest.nix
{}: {
  name = "web";
  basedOn = "base";
}
As usual, create default and manifest. The edition is based on "base",
therefore it will inherit everything from "base" and "light".
#src/packages/neovim/web/_envVars.nix
{}: {MY_ENV_VAR = "foo";}
We can specify environment variables that will be available inside the Neovim
edition runtime. I am currently using it to specify OPENAI_API_KEY.
#src/packages/neovim/web/_treesitterPlugins.nix
{}: treesitterPlugins:
with treesitterPlugins; [javascript typescript html css]
Treesitter plugins are passed as a list to the Treesitter plugin build function
nixpkgs.vimPlugins.nvim-treesitter.withPlugins.
#src/packages/neovim/web/_dependenciesEnd.nix
{pkgs}:
with pkgs; [
  nodePackages.typescript
  nodePackages.typescript-language-server
  nodePackages.eslint_d
  nodePackages.prettier
]
dependenciesEnd are dependencies that, due to a bug I encountered a long time
ago, need to be placed at the end of the list when creating the symlinkJoin
Nix derivation. If you are interested, you can find more details at
https://ertt.ca/blog/2022/01-12-nix-symlinkJoin-nodePackages/. Usually they are node or python packages.
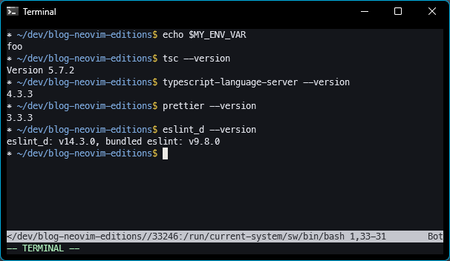
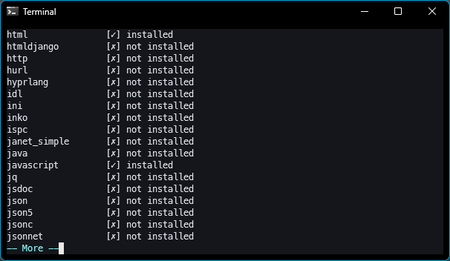
Run nix run .#neovim.web. Inside Neovim's terminal (:term), we can prove
that the environment variable is set and that dependencies can be found on the
execution path. Using :TSInstallationInfo, we can check that additional
languages are supported by Treesitter.
The real-life web edition is pretty simple, because most of the configuration is present in the base edition. There is some additional configuration for typescript and React, language specific snippets.
§ Conclusion
Neovim editions are a nice way to avoid creating a monolithic configuration, possibly with undesired interferences, while taking advantage of configuration inheritance and, of course, everything in the Nix world with all the benefits.
I hope you find this article useful, and if you need help or want to discuss don't hesitate to leave a comment.


Reddit comments
See on RedditGitHub comments